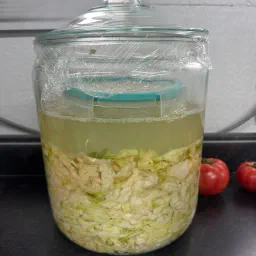
A lacto-fermented sauerkraut — tangy, spicy, and savory, with zero added sugar. No vinegar, no cooking, just cabbage, salt, and time. Optionally bulked out with garden vegetables like radishes and green beans.
Ingredients
- 1 medium green cabbage, cored and thinly shredded
- 1.5 tbsp fine sea salt (non-iodized)
- 4 garlic cloves, thinly sliced
- 1 tbsp red chili flakes (adjust to taste)
- 2 lemongrass stalks, tough outer leaves removed, bruised/smashed whole
- 1 fresh jalapeño or serrano, thinly sliced (optional, for extra heat)
- 2 light scratches of fresh nutmeg, grated on a microplane
- 1 radish, thinly sliced (optional)
- 4 green beans, trimmed and thinly sliced lengthwise (optional)
Directions
- Shred and salt the cabbage. In a large bowl, combine shredded cabbage with salt. Massage firmly with clean hands for 5–10 minutes until limp and releasing liquid.
- Rest. Let sit 15–20 minutes so it releases more liquid — this brine is essential.
- Add garlic, chili, and nutmeg. Mix in garlic, chili flakes, nutmeg, and jalapeño if using. Toss thoroughly.
- Add garden vegetables (optional). Fold in radish and blanched green beans so they’re evenly distributed.
- Pack into a jar with lemongrass. Pack tightly into a clean large mason jar, pressing with your fist or a tamper to remove air pockets. Tuck the bruised lemongrass stalks down into the jar.
- Cover with brine. Press down until brine rises above everything. Top up with a splash of water + pinch of salt if it doesn’t fully cover.
- Weigh it down. Use a fermentation weight, a smaller water-filled jar, or a whole cabbage leaf to keep everything submerged. Exposed veggies can mold.
- Ferment at room temperature. Cover loosely (cloth or airlock lid — not sealed tight) and let sit at 65–75°F (18–24°C), out of direct sunlight, for 1–4 weeks. Taste starting day 5; longer = tangier.
- Refrigerate. Once it’s at your preferred tang/spice level, remove the lemongrass stalks if desired, seal, and move to the fridge.
Serve at room temperature or straight from the jar.
Notes
- Bruise the lemongrass with the back of a knife to release oils, then keep whole stalks in the jar for easy removal later.
- If using green beans, blanch briefly (30–60 sec boiling water, then ice bath) for better texture — not required, but recommended.
- Cut garden veggies to a similar thinness as the cabbage so everything packs tightly and stays submerged.
- Keep nutmeg subtle — 2 light scratches, not a spoonful.
- Avoid metal bowls/utensils when salting; use glass, ceramic, or wood.
Salt
Do not use iodized table salt — use plain kosher salt, canning/pickling salt, or a non-iodized sea salt. This is a live fermentation, not just a seasoning choice.
- Iodine is antimicrobial. It’s added to table salt specifically to be an antiseptic, and the lactobacillus bacteria that are supposed to take over this ferment are exactly what it suppresses. That can stall the fermentation, let the wrong microbes get a foothold instead, and produce a lingering bleachy/chemical smell rather than the clean sour tang of a healthy ferment.
- The anti-caking agents don’t help either. They keep table salt free-flowing but don’t dissolve, clouding the brine.
- If a batch smells bleachy for more than the first day or two rather than turning pleasantly sour, iodized salt is the most likely cause — switch to a non-iodized salt for the next batch.
Safety
Submersion is non-negotiable. Everything must stay under the brine the entire fermentation. Exposed bits are the #1 cause of spoilage.
- Harmless: a thin white film (kahm yeast) on the surface — skim it off.
- Discard the batch: any fuzzy or colored mold (black, pink, green), a genuinely foul/rotten smell (not just sour), or mushy texture throughout.
Shelf Life
- Once moved to the fridge, properly fermented kraut (fully submerged, no spoilage signs) keeps 3–6 months, often longer — it keeps slowly fermenting and getting more sour over time rather than “going bad.”
- This method is not shelf-stable at room temperature. It needs the fridge to slow fermentation down.
- For true pantry-stable jars (no fridge needed), you’d need to hot water bath can it — but that kills the probiotics, trading gut-health benefit for shelf life. That requires separate canning instructions.
Avoiding Jar Explosions After Re-jarring
Active fermentation produces CO2. If you seal a jar airtight while it’s still actively fermenting, trapped gas has nowhere to go — the jar can crack, bulge, or in bad cases shatter.
- Only tightly seal and move to the fridge once fermentation has slowed down — no more active bubbling, and the flavor is where you want it (usually after the 1–4 week room-temp stage).
- Even in the fridge, burp the jar (crack the lid briefly to vent pressure) once every week or two for the first month — it’s still fermenting slowly at cold temps.
- If the lid looks bulged, hisses on opening, or the jar feels unusually hard/pressurized, burp it carefully and point it away from your face before opening fully.
- Leave headspace at the top of the jar when packing/re-jarring — don’t fill to the brim.